A LOT of work goes into planning a Mystery Dinner, so if you are thinking of planning one some time here are a few tips to bear in mind that I wish I would have thought of before hand. (doesn't have to be Halloween, could be any time of year, just adjust your theme accordingly)
1. Even with small groups, it is best to recruit help! We had a total of 10 people (8 playing the game and 2 serving the food). I really needed a 3rd person back in the kitchen helping prep and serve food, it would have gone a bit quicker with an extra set of hands, but we did good with the 2 of us serving. Remember when choosing your servers they will know what the options are (and if they are helping you plan they will know well in advance) so pick someone who is good at keeping secrets :)
2. Take pictures of everything...no matter how behind you get, because afterwards, you'll be sad you didn't capture all the foods (like me).
3. Even as the planner and a server, have FUN! (we did, but I still wanted to put this out there!)
4. Get as MUCH done well in advance as possible. Prep food that can be prepped the day before, have all of the decorations, games and printouts done and set up two days in advance (if you can) to help you better manage your time.
5. Try the complicated things before hand so you can be prepared for the disasters that could arise. Our disaster was the curtain hanging to block the view into the kitchen. I think we tried four times and it kept falling. Allow enough time to do things like this before the day of the event so you can focus the day of the event on making the food.
6. Minimal is better. We tackled a HUGE menu...I say if I were to do it again, I'd have taken away one of the groupings. It was a lot of food (a lot of leftovers, some waste, and a lot of time preparing).
Ok so now to the fun stuff...lets get planning shall we?
The very first thing you need to do is come up with your theme. This took a lot of thought and effort and bouncing ideas off of friends to try to figure out. I finally settled on three different choices, Skeleton Crew, Witches Trio and Vampire Slayers. These three names were based on the utensils they would choose to eat with. Only I knew what each one held inside the bags and as the RSVPs came in, it was clear that Vampire Slayers was a favorite among our group. Skeleton Crew didn't get any votes and Witches Trio had three picks. I'll reveal later what the utensils were...but for now, know that these three themes were carried over into the menu. I decided on 2 appetizers, 1 entree and 2 desserts as my guide.
Next thing you need are your invitations. If you missed my previous blog on the invitations I made for this event, feel free to stop over HERE to check those out. You will also see one of the prizes we did, the "Food Pass". This was an awesome addition and they were used, so be sure to put at least one of these at each table. The way we did it was since I was the planner, I numbered all of the seats (you'll see these numbers in the photos I'll share later). I had my server and assistant planner choose a number from each grouping (so table one was 1-6 and table two was 7-10). She picked 3 and 7 so I put the passes on the bottoms of those two chairs and then set the name cards out. It was neat to see who she picked.
Plan the Menu! This can be overwhelming! I scoured the internet in search of ideas to go with my theme and had a hard time finding something for everything so I had to get creative. I want to first share with you the menu:

I planned both an adult menu and a kids menu (kids tend to be pickier and I wanted to tailor it to be something I knew they'd enjoy eating).
Kids Menu (sorry I didn't get any pictures of their food :( so sad I know)
Appetizers (they got one of each)
Skeleton Bones - Turkey Bites on the ends of a pretzel stick to look like bones
Broomsticks - cocktail hot dogs cut on one end to look like a broom head and then wrapped on top with crescent roll cut to fit
Vampire Smile - Apple wedge with peanut butter smeared on top and mini marshmallows to look like teeth with candy corn as the fangs
Entrees (they chose one)
Skulls - Mini Pizzas made out of biscuits with the pepperoni in the shape of a smiley face
Zesty Witches and Wands and Bloody Guts & Slayers Armor are both adult menu items as well as the Desserts so I'll break those down for you next.
Adult Menu (I failed to get photos of all the foods due to time, so I'll try to describe everything best I can)
Appetizers (they picked three from the list)
Spicy Humerus - Hot Chicken Wing Dip with Tortillas
Funny Bones - Bread sticks in the shape of bones, we cut the ends and curled them down prior to baking
Broomsticks & Potions - Celery and Carrots in a cup with ranch on the bottom
Spicy Eye of Newt & Spotted Toad - Chicken Tortilla Soup and Tortillas
Dracula Fangs - Deviled eggs with red peppers cut out to resemble fangs and stuck on top
Bat Bits - Ham and Cheese sandwich (these were tricky, we cut one slice of break using a bat shaped cookie cutter but it was really small, so we ended up cutting the bread in half and using one half slice for the bottom and then put the bat bread on top of the ham and cheese)
Entrees (they picked one from the list)
Severed Hand & Goo - This was to go for the Halloween WOW factor and boy did it. This was really easy to make and delicious to eat! Use a hand gelatin mold, spray the mold with Pam add your meatloaf mixture (use your own recipe here) dump out onto a cookie sheet lined with foil (easy clean up) and add white onion cut to resemble nails and I even cut one to look like a bone in the wrist. Add catsup mixture on top (again your recipe will work here) and halfway through I threw some cheese on top and broiled it at the end.
Before baking:


After baking, I added mashed potatoes around and in between the fingers using a plastic bag with the corner snipped off.

Zesty Witches and Wands - Italian Sandwich and Cheesesticks
Italian Sandwich Recipe: Bread is made using two tubes of French Bread Dough (refrigerated section), form to look like a ring, bake according to package. Cut open the dough so you have a top and bottom for sandwiches and then cut to desired length. Add zesty Italian Dressing to the bread, and put on your lunch meat and cheeses you want.
*One thing we forgot to put on this were the really neat witch feet toothpicks I had made up prior. We were pretty hectic trying to get the food out (again a third set of hands would have been helpful here)

Bloody Guts and Slayers Armor - Spaghetti and Garlic Bread

Desserts (they got to pick three from the list)
Bony Fingers - Chocolate covered pretzel rods using a Wilton Finger Mold

Eyeballs - Red velvet cake pops decorated to look like eyes

Witches Hats - this recipe was a hard one...it didn't turn out quite like we had hoped, but was still ok to eat. This is a ice cream cone covered in chocolate and rolled in sprinkles. There is a chocolate cookie wafer on the bottom and the inside should have been chocolate mousse but it didn't turn out. I probably should have just done chocolate pudding, it would have been way easier! :)

Witches Goup (no photo sorry) - This was mint oreo ice cream and I made a cookie witch hat to go on top. We put the ice cream in these really neat clear cups that were small and then put that hat on top to make it look like a green witch :) The hat was easy to do it was a fudge stripe cookie with icing around the center opening and then a hershey kiss on top.
Blood Suckers - Jello poke cupcakes with a pudding/coolwhip icing and then use a straw dipped in food coloring to get the blood effect on top.

Coffins - sugar cookies decorated to look like coffins. NOTE: I cheated here and bought the refrigerated sugar cookie dough to save time...I did not anticipate on them to spread as much as they did so they ended up not quite looking like coffins. I say next time, use your sugar cookie dough recipe to get the true shape!

Drinks (no photos)
Bone Marrow - Lemonaid (yellow)
Witches Brew - 2 things of frozen apple concentrate, 2-liters of club soda, 1 red apple sliced and put inside the drink
Vampire Nectar - Cherry Limeade
And while this is not food, these are the Vampire Slayers drinking glasses. I got plastic champagne flutes and we made a hard tack candy and rolled these in the hard tack before it hardened and let it drip down. *NOTE* hard tack gets very hot, depending on the thickness of your plastic drinking glass, it could melt it so be careful and always test prior to doing them all. These were thick enough that they didn't melt. I got these at the Dollar Tree they were in packs of 2 for $1.

The witches had a plastic wine glass that was black and had "Witches Brew" printed on the front. I picked them up at the dollar tree for $1 each.
Utensils:
Skeleton Crew (no one picked it, so no photos) - Toothpick, Straw and Chop Sticks
Witches Trio - Fork, Spoon, Knife


Vampire Slayer - Wooden Spoon Set and Vampire Teeth


Kids Utensils - since kids are still learning motor skills, it is best to make sure they get utensils they can use, so we gave them a fork and spoon and a really cool straw that they could use as well.


Water Bottles were essential. Because each person is different, and I don't really know how picky people are as far as food is concerned, I wanted to have a water bottle set at each place setting for them to use in between to kind of rinse out their mouths. This also served as a double if their drinking glass was empty and we were running behind in the kitchen they still had something to drink as well. I made labels out of photoshop and am including photos of those for you to see how I did them. The trick I have found when making water bottle labels (ran across this many years ago when passing out water bottles with customized labels for Church) this helps the label print to not sweat and smear and run, you use packing tape and put the label on the tape and then secure it on the water bottle using the tape...the trick, make the tape longer than the label and make the label width a little smaller than the width of your tape.
Step one - make the labels in photoshop. I typed out the sizes I used below.

Print out labels, and then cut.

Grab your water bottles and remove the outer label

Using packing tape, add the labels to your bottles and enjoy! EASY!


Time to Decorate!
Please know that I am a frugal holiday decorator, as in, I don't like spending money on things I probably am only going to use once. So, get creative is what I told myself! I made what I could and what I couldn't I refused to spend more than $2 on unless it was a unique item that I had to have to make the space work. I think the most expensive item I purchased for decorations were on the vampire table and it was the candle sticks. They were LED lights and looked like it had dripping blood. Had to have those :) Other than that, I got everything either at the Dollar Tree or Walmart and searched for cheap things.
Witches Themed Table -
I grabbed basically anything that went along with witches here and put them together best I could.
There are tiny witch hats and glitter pieces that say boo and have cats cut out of them on the table as well. The center piece is a witch hat that I stuffed so it would sit up. Two cauldrons are on the table with spider webbing to look like foam coming out of them. You can't see the salt/pepper shakers but they were eye balls.
There are tiny witch hats and glitter pieces that say boo and have cats cut out of them on the table as well. The center piece is a witch hat that I stuffed so it would sit up. Two cauldrons are on the table with spider webbing to look like foam coming out of them. You can't see the salt/pepper shakers but they were eye balls.

I took the below shot from a different angle to show you the curtain I hung up to block the entry into the kitchen so they couldn't' see what we were doing :)

Vampire Slayers Themed Table - Rubber bats all over the table, vampire teeth, coffin, vampire cutout, LED candles with blood drips and the salt and papper shakers are eye balls.


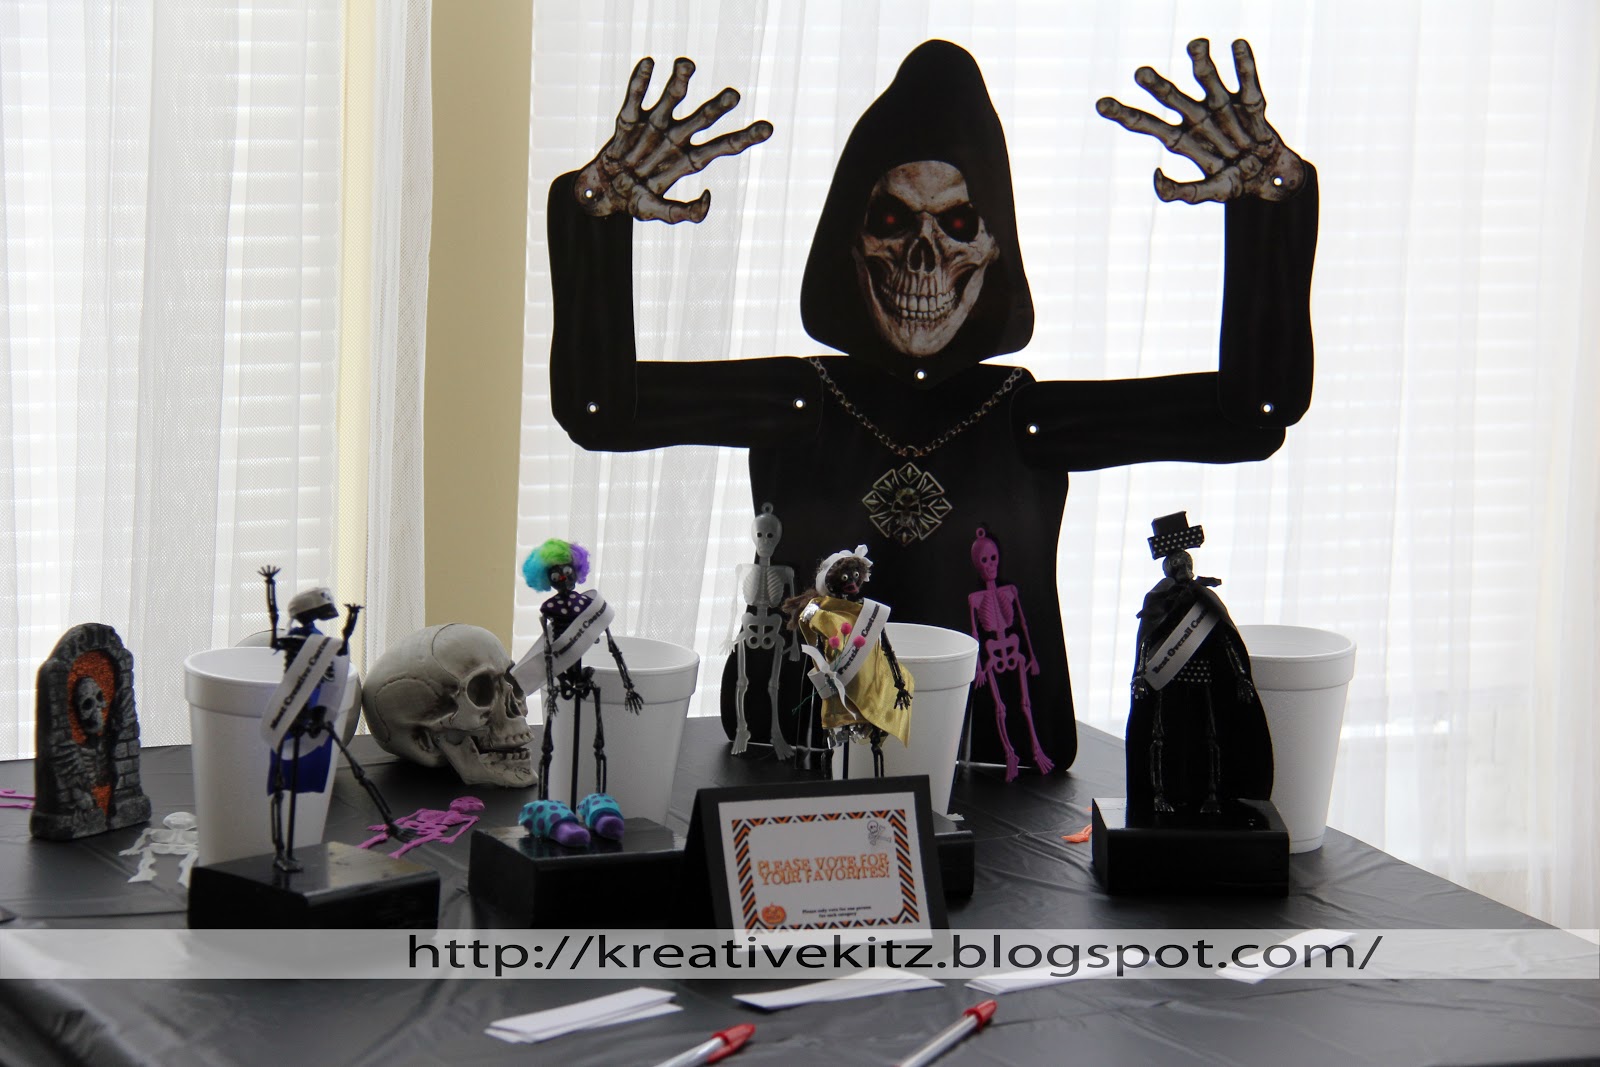
Skeleton Crew - Voting Table
The Skeleton themed table was the home of our trophies for the costume contest and had a voting center. Decorations on here are a skeleton cutout, skulls and skeletons in different colors.
Too see the blog on how to make the skeleton awards, goo HERE


Every party should have games! This was no exception!
We had a costume contest - winners got trophies (as shown above)
During Dinner we played: Bingo, Halloween Movie Trivia and had an icebreaker where they passed around questions with different scenarios they had to talk about how they would handle the situation. These were based on thrillers.
After dinner, we played survivor.
The kids played some games too, they played Bingo and we had one kid winner and one adult winner. The kids also got to search the house for hidden eyeball eggs (kind of like an easter egg hunt) and then we played freeze dance where they danced to spooky music and had to freeze when it stopped!
Bingo:
I decided to make a Bingo Card using Photoshop and called them throughout the appetizer round to help pass time while we prepared the plates.


Survivor (sorry, no photos, we were really busy!)
First thing I did was split them into two teams we did boys vs girls
Before we started Round 1, I read a riddle that would lead them to find a hidden immunity idol. The person who found it could use it to stay in the game.
Round 1 - Card Houses - each team had to build a card house and keep it standing. The one with the highest at the end of five minutes won. I put both teams on the same table (probably a big mistake!) The girls bumped the table when the guys got too high and resulted in the girls taking the immunity idol for this round. (sorry guys!)
Tribal Council - I used a deck of cards as tribal council votes to keep it fair. If you drew a Jack you were eliminated. Round one eliminated 2 players on the guys team.
Round 2 - Eating Contest - black licorice, sour worms and saltines. The guys pulled a win on this one!
Tribal Council - I used a deck of cards as tribal council votes to keep it fair. If you drew a Jack you were eliminated. Round two eliminated 2 players on the girls team. The idol was used on this round saving one of the girls from elimination.
Before starting Round 3, we did another drawing to bring back one player using their seat numbers. One of the girls was put back into the game!
Round 3 - Blind Folded Trust Challenge - contestants had to navigate one player who was blind folded around the house using only words. The blind folded player had to also carry a spoon with a feather on top and if the feather fell, the guide had to instruct them on where it was to pick it up. This game was really interesting, with the guys falling behind early on due to dropping the feather and not being able to find it. The girls were taking the slow and steady route and had a big lead on the guys but they caught up to the girls at the end and as paybacks, blew off the girls' feather causing them to lose and gaining the idol.
Tribal Council - I used a deck of cards as tribal council votes to keep it fair. If you drew a Jack you were eliminated. Round three eliminated 2 players on the girls team.
Round 4 - Puzzles - one player from each team had to race to put together a puzzle. The girls took the win for this one.
Tribal Council - I used a deck of cards as tribal council votes to keep it fair. If you drew a Jack you were eliminated. Round four eliminated 1 player on the guys team. This left our group with only two players left.
Final Round - Memory Tray - I put together a tray of items that you may use while camping. I gave each player two minutes to study the tray and try to memorize what was on it. After the tray was removed I gave them two minutes to write down everything they could remember. The girls took the win and won the game overall.
Prizes: I did give out prizes for all the games, this can be adapted for your group of attendees. We had mostly girls at our party so the prizes were geared more towards the girls (candles). I also had bags of candy made up for some of the other prizes and for the kids I had stickers and candy prizes as well.
I hope you enjoyed my breakdown of the Mystery Dinner! Enjoy planning your own and if you have any questions feel free to comment below!
Happy Halloween,
Shonda
No comments:
Post a Comment