Showing posts with label Organize. Show all posts

Tuesday, November 27, 2012

Budgeting for the Holiday's - how to survive!

Every year as Christmas time approaches I think our stress level increases as we talk about the budget.  No one likes to have that discussion...how much is feasible to spend and how much is realistic to spend?

I have always been known to outdo it every year, because I want nothing but the best for my family and friends.  I have done the extreme where I don't really shop for sales and just get what I know they want, and I have done the frugal where I only buy something if it is on sale.

This  year, like every year, I went out on Black Friday.  Even starting at 6:00 a.m. it seemed as though every where I went I was too late to get that one thing that was on my list for each person.  It didn't matter what store I went to, the things on my list were never there.  By the end of the day I was tired, frustrated and concerned because this year, I knew I have to be frugal in my Christmas spending.

I had already spent close to half the budget and I only had items for six people on my list but only got everything for two of the people.  This set me into panic mode, so I turned to Excel to help me wrap my head around it all.

I created three different spreadsheets.  Excessive?  Maybe, but it actually is very helpful in showing me what I need to see.  These spreadsheets should not include your spouse and children, you will want a separate one for them, this is strictly for your family and friends that you shop for every year.  The examples I am using can be tailored to fit any family need.

The first spreadsheet what I did was made four different columns as follows:


Seems simple enough...right?  What you need to keep in mind is this; Who are you buying for and how much is your MAX amount you want to spend on each person.  We also added an area with what realistically we wanted to spend and I showed the Total Over that amount of our projection.  This put it into reality for me.  I needed to find some items on sale so that the retail price would hit where we wanted to spend for each person but my Total Spent was lower.  For example, one person we bought for wanted a appliance.  So I went on a hunt for the best deal for this appliance by searching Black Friday Ads.  The first two places I went to, they were out.  The third place, I get lucky and find one, original price $30 picked up for $14.99.  So when I add up what I spent I add up the retail value as well as my out of pocket cost.  So $30 goes towards say a $50 budget and I know I have $20 left to spend for this person.  But in reality I only spent $15, so I saved $15 which helps my total overage go down.  (note:  This is not an actual item I purchased, because I don't want to give it away to those I am buying for, but I did get a $30 item for $14.99 this year) :)

This spreadsheet shows me my overall budgeted and total spent, it doesn't break it down so I can't really see where the money went, but one of the next two spreadsheets will help with that.

To keep in mind, Column C you always start off with what you budgeted and as you spend, you adjust your totals from Spreadsheet 3 as you go.  My totals may look funny, but they are actually because the formula is set in place for what it will be like once all the receipts are added.

The second spreadsheet is where I wanted to see how much money was spent per card.  I broke it down by credit card and bank card.  This was so I could up on my budget and know where the money was taken from.  If you use credit cards at Christmas time, it is more helpful if you look at your bank account and figure out realistically what you can spend from your bank account.  You want to spend as much cash on hand as you can so that you don't go farther into debt.  If you simply don't have the cash on hand and have to use credit cards, I recommend that you pay off a big chunk (or all if you can) on the card you want to use so that it doesn't set you back any farther.

By going to this spreadsheet, I am able to take a quick glance and see my total spent in each area, and I will total the columns up every time I add to it.

This is what the second spreadsheet looks like:


Now on the meat and bones, where is your money going?  If you are like me and you see a good deal on something you need for the house, you tend to pick it up.  I did this all day Black Friday and got things that we needed for a lot less than I would have spent if I would have waited.  It's ok to do this only on necessities but try to keep it at a minimum and ask yourself, do we really NEED this item or can it wait?

This is what the third spreadsheet looks like, it is a bit more complex so I am going to try and break it down for you:


Column A - Start with the Store Name off of the first receipt in A-1 and in C-1 put what card was used at this store (CC=Credit Card; BC=Bank Card).
A-2 start with the first item on the receipt - who did you buy it for?  Put their name in column A and go down the receipt until all names are entered for each line on the receipt.

In C-2, start with the first item on the receipt - what was the price?  Put the price for each line down Column C next to the names you put in first.

Now this is where it gets a bit tricky.  I decided I needed to give everything a number, so starting in column F, I put numbers down row 1 and then in row 2 I put who each number was going to represent.  Be sure to include Tax, Total CC Spent, Total BC Spent and I also included a space for returns because I knew I already have something I wanted to return.

Once this is set up, in Column E, put what each line will represent, I chose Spent, Budgeted and Difference to show me how much I had already spent and what I still had left.  You will need these totals to input  your total spent on the first spreadsheet.

Once you have your numbering system figured out, you will want to go to Column B and input the number coordinating with each person.  Once that is complete, now the fun begins.

In the spent row (i.e. F-3); you will need a formula to calculate from everything in column C what was spent for each person.  You do this formula as follows:

Click on the down arrow next to the AutoSum function in the ribbon; Click on "More Functions"; Look for the function "SUMIF" and click on that and then click "OK"; You will see a box pop up with Range, Criteria and Sum_range.

For your Range,  you will want to click on Column B by clicking on the "B" in the grey box at the top of the spreadsheet.  This will put the marching ants on the whole column and you will see a "B:B" in the box.

Once you have made that selection active, press "TAB" this moves you to the Criteria box.  Now, you want to click on the number in the column your cursor is in, so for this example it would be column F, which is number 1 - Her Mom; Click on the number 1 (F-1); you will see the marching ants go around the cell indicating it's active.

Once this is done, press "TAB" to move to the Sum-Range box.  In this box you need your totals, what is it going to add up and put in the cell you started in?  You will want to click on Column C by clicking the "C" in the grey box at the top of the spreadsheet to select the whole column.  By doing it this way, you are automatically adding anything that you may put in this spreadsheet in the future.

Once all three boxes are populated, you should have the following in the boxes:
Range:  B:B
Criteria: F1
Sum_range: C:C

If the boxes match, click OK.  You should then see in F1 a total amount of all the amounts next to where you put the number 1.  If you want to double check that it added it up correctly, go through your list and add up the totals manually for that person to make sure it did it correctly.

Unfortunately, you cannot copy this formula to the next cell, so you will need to repeat the process for all of the cells in order for it to work properly.

Once all of the cells are complete for the "Spent" row, the next thing you do is add your Budget under each of those totals by manually typing in the amount.

For the final row, Difference, it's pretty simple.  You do a simple formula that looks like this:
=F4-F3

What this does is it takes the Budget and Subtracts what you spent and shows you what is left (or what you went over).

By using these three spreadsheets you can get a handle on where your money is going so that you don't over spend.  Once you reach a level where  you are comfortable for each person, then stop.  For sale items where  you are wanting to figure in the retail value instead of the sale price, you will want to keep this somewhere else.  If you were to put retail value then your total CC and total BC will be off and that will not show the real amount you spent.

What I have done with this is went back to Spreadsheet 1 and off to the side in the empty columns is added it up that way and then do a sum across the totals.

For example:
Say for Her Mom, you got an item that retailed at $30 for $15 on sale and you want to figure out what would be left for you to spend on Her Mom using the retail value instead of the sale price.

On Spreadsheet one in Column E you will put $30.  Lets say you also spent another $10.50 on her for a different item, so lets add $10.50 to Column F next to Her Mom.  You have at this point only bought two items but you want to see where you are at as far as your budget for Her Mom, in Column G, you will want to put a formula for the Sum of Column E and F which would look like this:  =E2+F2  Your total should now show $40.50, highlight G2 in yellow so you know this is a total amount spent and not part of a receipt.  In column H, you will now want to see what is left to spend on Her Mom, so the formula should be =D2-G2 which should give you $9.50.  If the item is in the good (meaning not a negative amount) make the type green to indicate you still have funds available.  If the item is in the negative, make the type red to show you went over.

Here is a sample of what it would look like with an overage and with available funds:


Remember, the key to not overspending, is to be organized, and know where every penny goes!  It's already helping us this year and I feel so much better about it and know that I will be very close to what we budgeted.  If you go over, make sure you don't go over excessively, and keep track of what you buy!  (THIS IS KEY!).

When out shopping, I like to carry an envelope in my purse.  I have everyone's names on the outside of the envelope with what is left of their budget and as I buy, I write next to the budget what I spent so when I go to the next store, I know what is left.  Inside the envelope goes the receipts.

As soon as I get home, I open my spreadsheet up and start on the first tab and move my way to the third until all receipts are added.  I then write the names of who the items bought were for along with a check mark in the upper right corner of the receipt indicating I have logged it.  All receipts get filed in a Christmas File Folder in our Filing Cabinet so that next year, I still have records of what I bought for each person and how much I spent so I can prepare the budget for that year.  It's very helpful to keep these receipts also in case someone needs to make a return and you didn't get a gift receipt!

How do you currently budget? Do you have something already in place? I'd love to hear from you, please leave a comment below and let me know!

Best of luck to you this Holiday Season with your budgets and your shopping.

May your Holiday's be Merry and Bright,
Shonda


Saturday, September 29, 2012

Laundry Room - Under Construction

I really wish I could take part in this weeks challenge...the Laundry Room, however, I have a laundry room in the basement, in an unfinished area.  It's the ONLY part of the basement other than two closets that are not finished and has left me wanting to remodel.  I am looking to paint the floor (concrete), add a rug in the center of the room and hang panels to hide the unfinished walls and the pipes that run throughout the room.

Since this is what we want to do to this room, it is a project that will have to wait.  So for now it only houses a washer and dryer and a shelf that has some items on it (already organized).

For now, this area is "Under Construction" and once we do the makeover I'll be sure to post some before and after photos for you :)

If you have any ideas to help with an unfinished part of the basement that cannot be finished due to pipes in the way, please leave them in the comments below!

Until then...


abfolbutton

Saturday, September 22, 2012

The Office gets organized FINALLY! :)

Organizing the Office

Having recently moved, the office was being neglected while other area's were being worked on, so this challenge was a huge undertaking.  With being new homeowners, the previous homeowners left us all the manuals for everything in the house, which is awesome.  What wasn't awesome was that they were in a huge pile on the desk waiting to be looked at and decided if it was something we needed to keep or needed to throw out.  In addition to those manuals, I have been saving manuals for everything just in case.  I have had it happen before where I thought I wouldn't need a manual so I threw it out only to find out a month down the road I needed it!  What a pain!

So, I decided it was time to combine the two but before I could do that I had to go through them so I dumped them all over my desk which ended up looking like this:


After a very long day, I finally completed the task and am happy with my mobile manual keeper which we keep in an unfinished closet in the basement in case we ever need to get to it, but out of the way so it's not taking up useful space.

This is what I started with supply wise:


Check out the finished product here:


The next task was to go through our two 3-drawer filing cabinets and taking out the files that we both need to access and put them in our new 2-drawer filing cabinet that was going to be under the desk.  I was able to purge and shred quite a bit of old paperwork so that made room for everything we needed in the 2-drawer cabinet.


In order to keep both my husband and myself on target with being organized, I created two command centers.  One is in the stairway leading down to the office and the other is a file system on top of the desk.

The command center is actually pretty amazing and I love having it there.  It has a mail holder for the incoming mail that needs to be taken to the office, a dry erase calendar that keeps all our important dates in one location, a birthday calendar by month is next to that with the family and friends birthday's listed and then a big magnetic board holds business cards, appointment cards, and important things that we need to grab on the go.  I would love to put a wall vinyl above it but I have yet to determine what it would say...so that's on the list of wants, but I haven't figured out quite yet what it would be.

Command Center pull back:


Close up of the monthly Family Calendar and the Birthday Calendar (from Stampin' Up!, you just add decorations)


The file system on the desk houses receipts, temporary receipts (the ones you keep just in case you need to return something and then pitch after a month), to file, incoming mail, outgoing mail and my favorite the "needs attention" folder


Now to the nitty gritty...here is my desk before I got started in cleaning everything up...yes it's a mess, but there are two of us using this space daily and we have tons of projects going on so pretty much everything out was being used that week.


Desk after (yes we have two monitors hooked to one PC, it's for photo editing since we do photography)

This shot shows the desk, table, file cabinets and book case that holds the cricut and one of our printers on top


Close up of the shelf with the cricut items and the extra printer we have BEFORE I cleaned it, notice you see the battery charger and the box under that is an organizer that houses all the batteries by size.

Same shelf after it was cleaned


 Printer/File cabinets after

Media Tower After (it was empty before and all the stuff was in a box in the garage that I cleaned a few weeks back so they finally made it to their home)

 Close up of media tower so you can see the labels.


And that, my friends is one successful organization of the office FINALLY!  It feels good to not only have the office boxes out of my garage, but all the stuff that was in the boxes are now out of the boxes and in their homes permanently :)  AHHHH that feels good :)

Until next time....
Shonda


abfolbutton

Friday, September 21, 2012

Week 03 - The PANTRY!!!!


One of the many reasons I fell in love with this house was the pantry.  I went from a small hard to use pantry to a glorious space that is not too big and not too small and for us is just right.

I eventually will be changing the way I have it but for now, it is functional and organized and I love how easy it is to find everything.  My goal is to get more of the Better Homes and Gardens Flip-Tite Storage Containers in all shapes and sizes.  You can see the 4-piece Storage Set shown in my photos at the following link:  BH&G Flip-Tite 4-Piece Storage Set


Pantry Before


Pantry Before


Pantry Before


Pantry Before


Grocery trip the day that I was working on the pantry resulted in items hanging out on the counter tops for a bit until I was done :)


Pantry After: 
Reorganized all the baskets, threw out items that were expired and moved things around a bit


Our pantry also houses our trash cans - black is for trash, tan is for recycling.  
I am working on labels for them now.


Probably one of my favorite new things in my pantry are theses spice racks that we mounted in the open space.  I got these at IKEA and painted them white.  

The jars I actually took from an old fashioned spice rack, donated the actual rack to goodwill and then took the jars and frosted the tops and added labels to the jar to show what spices were in them.  I also wrote on the backs of these with a dry erase marker the date the spice expires.  

I love the way these turned out and re-purposed what I had so I didn't have any extra cost.


I knew I wanted a quote in the pantry and this one that I found online is perfect!


One thing we are purchasing this year will be a buffet table for the dining room.  Once we have it in place, all of the paper products in the baskets on the top shelves will be moved into the buffet which will open up the top shelf for other items.

I am already getting more and more of the Flip Tite storage containers from Walmart and have started moving other items into them (new chip container is shown above).  My goal is to get all of my dry goods out of boxes and into these containers and slowly replace the baskets.

I hope you enjoyed the look into my pantry.  It is very functional for us and we use it daily so it's always good to go back in and straighten up and organize it every once in a while.  I have now put this on a rotation schedule monthly to keep things moving and used and help eliminate loss of food.

If you haven't already joined the organization challenge, I encourage you to do so.  You can join at any time, start on the week we are currently on and then catch up with the other weeks you already missed.  

Next week is the Office!


abfolbutton

Friday, September 14, 2012

Week 02 - Garage Organization

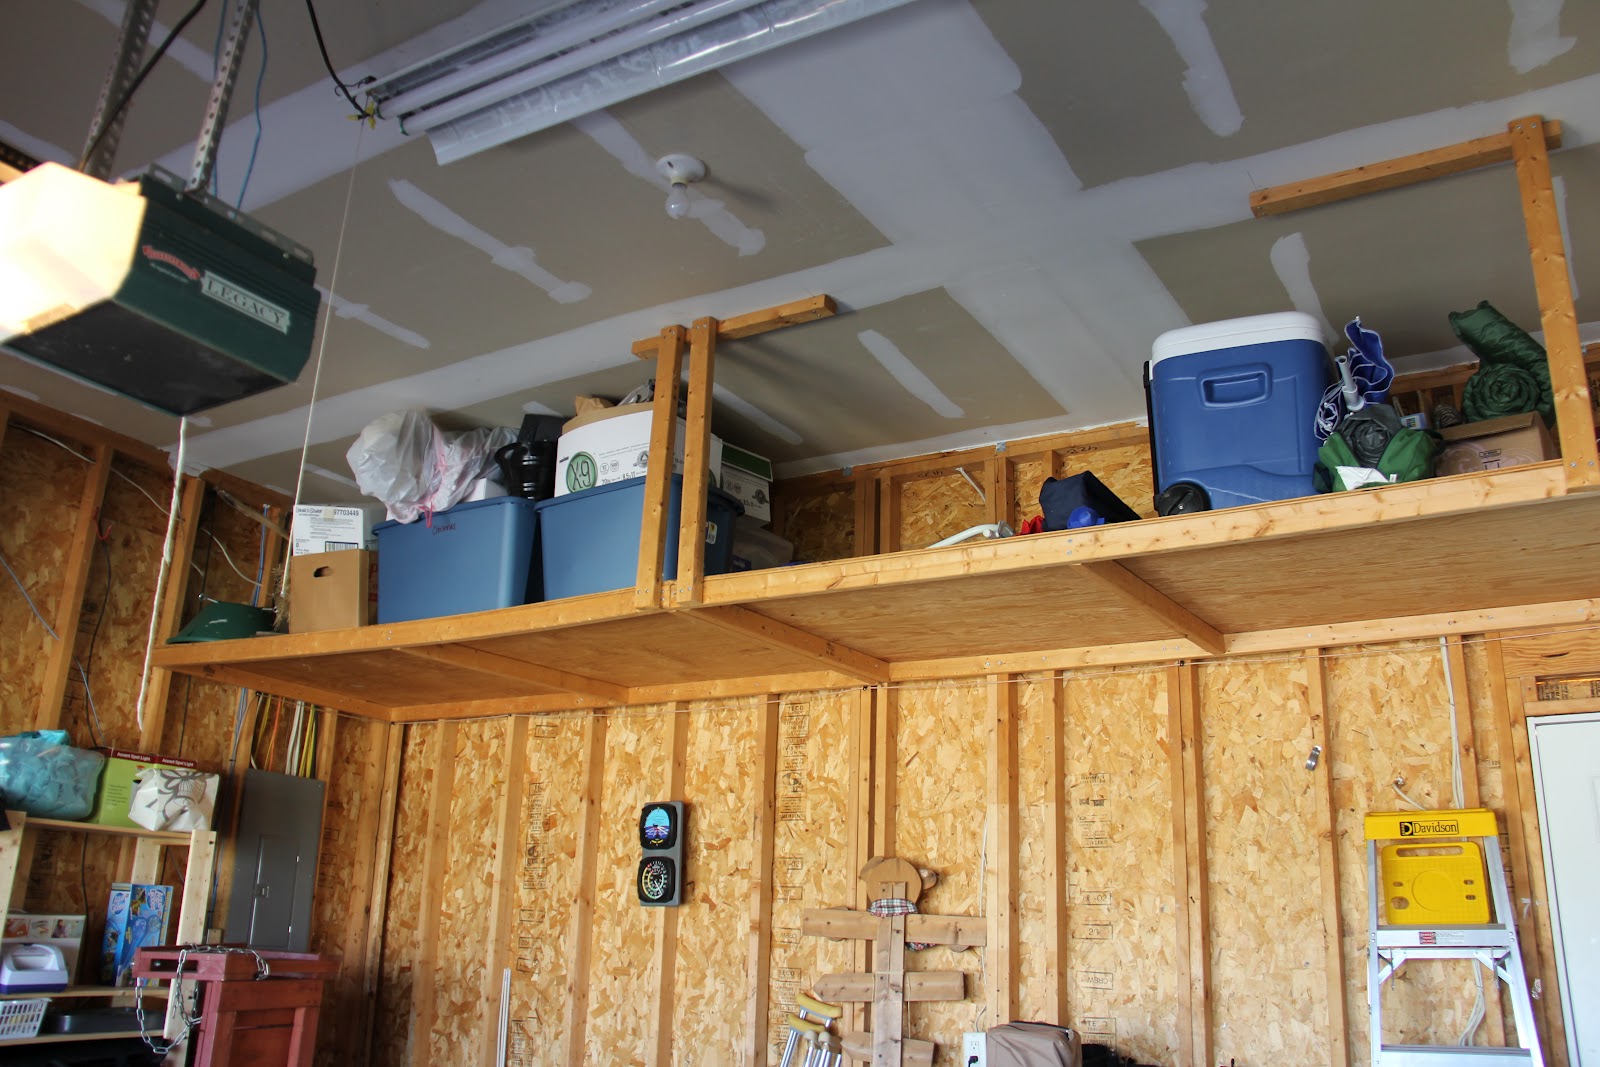
Week two in the Organization challenge has found me a bit stressed. With having recently moved, the garage is a mess!!! It has most of the boxes that still need to be moved in, we went from having a garage and a shed to having just a garage so there is a lot more items needing to be stored in the garage as well. I have decided that this will be an ongoing work in progress as I cannot simply finish it right now due to time and budget constraints.

 Here are the before pictures:

A view from the kitchen doorway

A view of the wall with the existing shelving

From the outside looking in:


Overhead shelving:


Work in progress, first set of "after" shots:

View from the kitchen doorway

Outside looking in..Look to the right against the wall, there are a TON of paint cans that will be going away in the future that was left by the previous home owners.  We want to dispose of these in a safe way.  Behind the paint cans are about six to seven boxes of books we are going to donate.

Shelves above.  The shelf on the left has all the holiday decorations which will be reorganized during each holiday and repackaged into different totes to eliminate clutter and some boxes.  The shelf on the right has camping and beach gear along with the coolers.


This is the wall with the existing shelves and will become my overflow side with my bulk items that I get like paper towels, baggies, soda, water, etc.


So there you have it...my garage is not entirely finished but after 12 hours of working in it, you can already see a huge improvement :)
abfolbutton

Monday, September 10, 2012

Yesterday's Adventures

So yesterday we started the garage organization.  I must admit I was a bit overwhelmed considering we recently moved and still had piles and piles of boxes waiting for us to go through, unpack, put away and decide what we want to keep, sell, donate and toss.  We have big plans for the garage, however, they are not scheduled to happen until sometime next year.  We need to get a workbench and some more shelves for my husband's tools.

We also have a TON of paint that was left by the previous owners that cannot be used.  We were able to dry up some of the paint and dispose of it properly, however, we still have a lot left that are almost full and colors we will never use.  We are currently looking for a place close to us that we can dispose of these safely.  The paint we are keeping and using (the new paint we purchased for the house) is being stored in the basement in our unfinished laundry room area.  This area doesn't get hot like the garage and will keep the paint at an even temperature all year long so the paint won't be ruined.

In the garage we also have 100's of books that we are wanting to pass on.  We are going to try to see if we can get some money from them from 1/2 price books, and then the rest (whatever they don't take) will be donated.  Both of us were book hoarders and we now have nooks and kindles that have our digital books on them so it's time to part with the books we no longer use.

I do have to say this, my husband was out there in the garage with me all day long.  We pulled items out into the driveway and brought things back a little at a time.  We are not finished, but it already looks 1000000 times better!  We can actually walk in the garage now which is even better!

I will post the before and after photos at the end of the week after I get rid of the paint and hopefully the books :)

Luckily, this time around, I only have to purchase one item for the garage from Home Depot and that is an organizer for the garden items (shovels, rakes, hoe's, etc.)

Such a great challenge we have this week!  A big thanks to ABFOL for doing such a great challenge!

Until next time,
Shonda

Sunday, September 9, 2012

Week One - Kitchen

Having just moved in to our new home, the kitchen wasn't really as bad as it could have been.  We had a few problem areas that I knew I needed to recreate organization and I scoured Pinterest in search of some ideas.

You can see my organization board by visiting HERE

Here's a walk through my kitchen.

This cabinet stores my cutting boards, stoneware and bakeware.  It also had a rice cooker crammed on the top shelf.  Upon taking everything out of this cabinet to reorganize I discovered empty space behind my cutting boards that I didn't realize was there.  I took advantage of the newly discovered space and moved some small appliances from other cabinets to the space and added another rack to hold the cookie sheets resulting in even more space under the shelf.  With a new open area on the top shelf, I moved my serving platters to this area to open up space in the tupperware cabinet.

My tupperware cabinet was a HOT mess!  This cabinet I really hated.  I have been contemplating getting a buffet for the dining room so that I can move my serving (white) dishes there as well as some other items from the pantry like paper plates, cups, napkins, etc that are only used at parties.  Eventually we may go this route but until then, I need a home for everything.  I took the dishes out and moved them to the cupboard you see above.  This opened up the whole left side as you can see and it looks MUCH better now :)

The cabinet that housed the Children's items has always been over crowded.  So I added a wire basket and moved some things around.  Even after I took this photo, I did another move where the bowls went to the wire basket and the plates that were in the basket went where the bowls are shown below.  I am truly happy with this cabinet now and it's way more functional than it was.


The cabinet that held the pots and the crockpot along with some small appliances was the one that I called the dangerous cabinet.  Every time you'd open the door, something fell out.  Now that I have minimized what is in the cabinet, it is much  nicer and things don't fall out at me!  The command hooks now hold the pot holders which allowed me to put the extra towels in the drawer above it.


That dreadful under the sink cabinet.  Upon taking everything out so that I could line the bottom with some cabinet liner, I discovered that this area is in need of repair.  It was this way when we first moved her a few months ago, but now it has gotten worse due to the weight of my (too many) cleaners.  I have purged some cleaners and will purge again I'm sure, it's finding that magical cleaner that works with everything that I am looking for.  We also purchased some wire baskets that will be installed on the cupboard doors but that is something that will be done after we renovate this cupboard.

The medicine cabinet was moved to this bonus cupboard as a way to keep everything close when needed.  I originally started organizing with the baskets from the dollar store that I saw HERE, however, they simply did not work in my cupboards due to the size.  I have been keeping my eye out on new bins at Walmart with flip tops that I use in other areas and decided to move some around and test it out in my medicine cabinet.  I was shocked at the space it freed up which allowed me to reorganize the mail center (blank cards, birthday cards, etc) 

This cabinet also houses our extra Keurig Cups which are organized in the basket on the bottom shelf.

Here is a close up of the flip top bins that I moved to this location and added labels to.


Some cabinets stayed the same because they were already pretty organized and had already been purged. 

First up...The glasses and cups. I did add the travel mugs from the children's cabinet over to this cabinet and they like their new home.


 Plates, Bowls and Mixing/Baking Items


Wine Glasses, Shot Glass collection (we collect them every trip we take) and although you see some liquor in there, I can't remember the last time we even used this (at our new years party perhaps) we are not big drinkers (with the exception of wine every now and then) but we always have stuff on hand for our guests.


Here is a close up of our Italian Hand Painted plates on top of our cabinets.  


 Now on to the Fridge and Freezer

The fridge I had read you shouldn't keep your eggs in the door, so I moved them and put the butter in its place.  We usually have two dozen eggs at one time anyways so moving them is actually more helpful as two dozen will fit in the new spot next to the yogurt.

I also lined the shelves with plastic placemats bought from Target.  I got the inspiration to do this from HERE somewhere on Pinterest, and I thought I pinned it but cannot locate the original source, so if you know, please add a comment to this post with the link (I like to give credit where credit is due!)


 I also added one of the placemats in the freezer because I take the ice cream bars (low carb of course) and put them on the top shelf and they always fall through.  Now, they can't which I love.  Generally the big pan in the middle isn't in the freezer but we made a pie for a birthday so it is in there for now.  That shelf usually holds the hubby's lunch for work.


This is the top of the Fridge which holds our cereal and small decor items


And now some pull back shots...This is the coffee bar (which originally is a desk but we turned it into a coffee bar)


And the counter with the sink.  The fruit bowl is new (Target) and there is a wine rack to be hung yet from Ikea that is leaning in it's new soon to be home.


Thank you to A Bowl Full Of Lemons for such a great challenge and a great way to kick off the 14 weeks of organization.  We cannot wait to tackle on the garage next!


abfolbutton